Are you looking to enhance your home’s functionality and aesthetics? Installing awning windows in a seamless application can do just that. This process requires precision and attention to detail for optimal performance.
In this post, we’ll guide you through each step of the installation, ensuring better ventilation, natural light, and a polished design.
Introduction to Awning Windows
Awning windows are hinged at the top and open outward, offering great benefits. They improve ventilation, protect against rain, and add visual appeal. These windows are often used in bathrooms, kitchens, and basements where air circulation and privacy matter.
What Are Awning Windows?
Awning windows are top-hinged and open outward, creating a unique design. This allows fresh air in, even during rain. With a hand crank, they are easy to operate. You can install them in different styles, including seamless applications, for a clean and polished look.

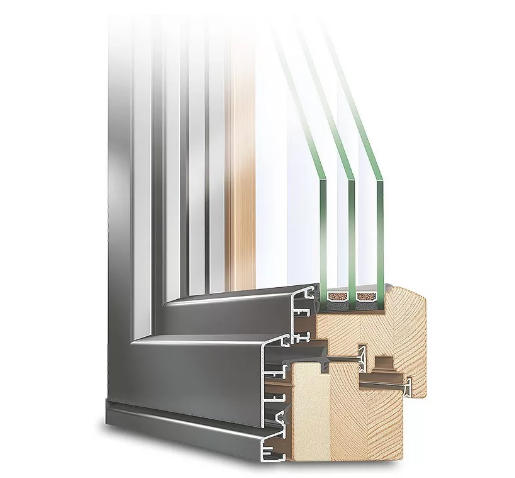
What is a Seamless Application for Awning Windows?
A seamless application for awning windows means the window fits perfectly against the wall, creating a smooth, flush appearance. This requires exact measurements and careful alignment to ensure it integrates smoothly into the structure. A precise, expert installation is necessary to avoid gaps that could lead to air drafts or water leaks.
Why is Seamless Installation Important?
Seamless installation plays a key role in energy efficiency. Proper sealing prevents air leaks, ensuring your home stays comfortable and energy costs are minimized. It also helps protect against water infiltration, which can be especially damaging in areas that face extreme weather conditions.
Additionally, a seamless fit improves your home's look. It gives a modern, polished appearance, adding to the overall aesthetic appeal of your space. When done right, it enhances both functionality and design, giving your windows a clean, professional finish.
How to Install Awning Windows in a Seamless Application
Installing awning windows with a seamless fit requires careful attention to detail. Follow this step-by-step guide for a smooth installation process, ensuring a perfect fit and optimal performance. If you want to know ways to opearte such windows later, please check how to operate your awning window.
Preparation: Key Steps Before Installation
Before starting the installation, preparation is crucial. Here’s what you need to do:
Accurate Measurements: Measure the window opening carefully. Double-check the height, width, and depth to ensure a perfect fit for your new window.
Remove the Old Window: If you’re replacing an old window, carefully remove it. Be sure not to damage the surrounding wall or frame.
Clean the Opening: Clean the opening thoroughly. Remove all dust, debris, and obstructions. The area must be dry and free of any blockages before installing the new window.
Installing the Window Frame
Next, it's time to position and secure the window frame:
Position the Frame: Carefully place the new window frame into the opening. Use shims to ensure the frame is level and plumb. Adjust as needed to achieve a perfect fit.
Secure the Frame: Once the frame is positioned, attach it to the surrounding wall using screws or nails. Be sure to follow the manufacturer’s instructions for proper securing.
Sealing and Insulating the Awning Window
Proper sealing is key for energy efficiency and preventing drafts:
Apply High-Quality Sealant: Use a premium sealant around the entire perimeter of the window frame to create an airtight seal. This step is crucial for energy efficiency and weatherproofing.
Insulate the Gaps: If you notice any gaps between the frame and the wall, fill them with appropriate insulation materials. This helps to enhance energy efficiency and prevent heat loss.
Attaching Hinges and Crank Mechanisms
Now, it's time to install the window’s hardware:
Install the Hinges: Attach the hinges to the top of the frame. These will allow the window to open outward.
Install the Crank Mechanism: Secure the crank mechanism to ensure smooth operation. This is essential for easy use of the awning window.
Final Adjustments and Testing
Once the window is installed, make sure everything works properly:
Test the Window: Open and close the window to check if the crank mechanism works smoothly. Ensure there is no resistance when operating the window.
Inspect the Seal: Inspect the seal around the window carefully. Make sure there are no gaps or leaks, as this could affect performance.
What to Expect During Awning Window Installation
The installation process can vary based on your home and the complexity of the project. Here’s what you can expect:
Duration
A typical awning window installation usually takes about 2 to 4 hours. The time depends on the size of the window and whether it’s a replacement or a new installation.
Clean-Up
Once the job is done, the installation team will clean up the area. However, it’s a good idea to cover furniture and flooring beforehand. This will help protect your home from any dust or debris during the installation.
Challenges in Seamless Awning Window Installation
While installing awning windows in a seamless application has its advantages, there are a few challenges to consider. Here are some common issues:
Structural Compatibility
In some homes, framing adjustments may be required to fit the awning window. The window’s unique design might not align perfectly with existing structures, so it's important to check for any needed modifications before starting.
Waterproofing Concerns
One of the most critical steps in installation is proper sealing. If the seal is not applied correctly, it could lead to water leaks, especially in areas prone to heavy rain. A poor seal compromises both energy efficiency and weather resistance.
Operational Clearance
Awning windows open outward, so you need to make sure there's enough space for them to swing open fully. Be mindful of nearby pathways, plants, or other obstructions. This ensures the window operates smoothly without interference.
Where to Install Awning Windows in Your Home
Awning windows are versatile and can be installed in various areas around your home. Here are the best places to consider:
Kitchens and Bathrooms
These areas need both privacy and ventilation. Awning windows are perfect for letting in fresh air while ensuring your privacy remains intact. They also help reduce humidity and odors, making them ideal for kitchens and bathrooms.
Basements
Awning windows work well in basements, where ventilation is important but moisture control is also a concern. Their design allows for airflow while preventing water from entering, which is especially useful in damp areas.
Exposed Facades
For homes that face harsh weather conditions, awning windows offer extra protection. The outward-opening design helps shield interiors from rain and strong winds, making them great for exposed facades or any areas facing the elements.
Conclusion
Installing awning windows in a seamless application boosts your home’s aesthetics, energy efficiency, and ventilation. With the right steps and professional help, you can ensure proper installation. Enjoy the lasting benefits of awning windows, from improved airflow to better energy performance, for years to come.
FAQs
1. What are the advantages of installing awning windows in a seamless application?
Installing awning windows seamlessly improves the aesthetics of your home and enhances energy efficiency. It also provides better ventilation while ensuring protection from water leaks.
2. How long does the installation of awning windows take?
The installation process typically takes 2 to 4 hours, depending on the window's size and whether it’s a replacement or a new installation.
3. Can I install awning windows in my bathroom or kitchen?
Yes, awning windows are great for kitchens and bathrooms as they provide privacy while allowing ventilation. Their design also helps reduce humidity and odors.
4. Do I need to make adjustments to my home’s structure for installing awning windows?
In some cases, structural adjustments may be required to accommodate the awning window style, especially if you are replacing an old window.
5. Where are the best places to install awning windows?
Awning windows are ideal for kitchens, bathrooms, basements, and exposed facades. These locations benefit from better ventilation, privacy, and weather protection.


